This is an how-to that helps me setup a new VPS with my backup instance
This is not the right way… This is my way of doing things
Preparing the Hetzner part
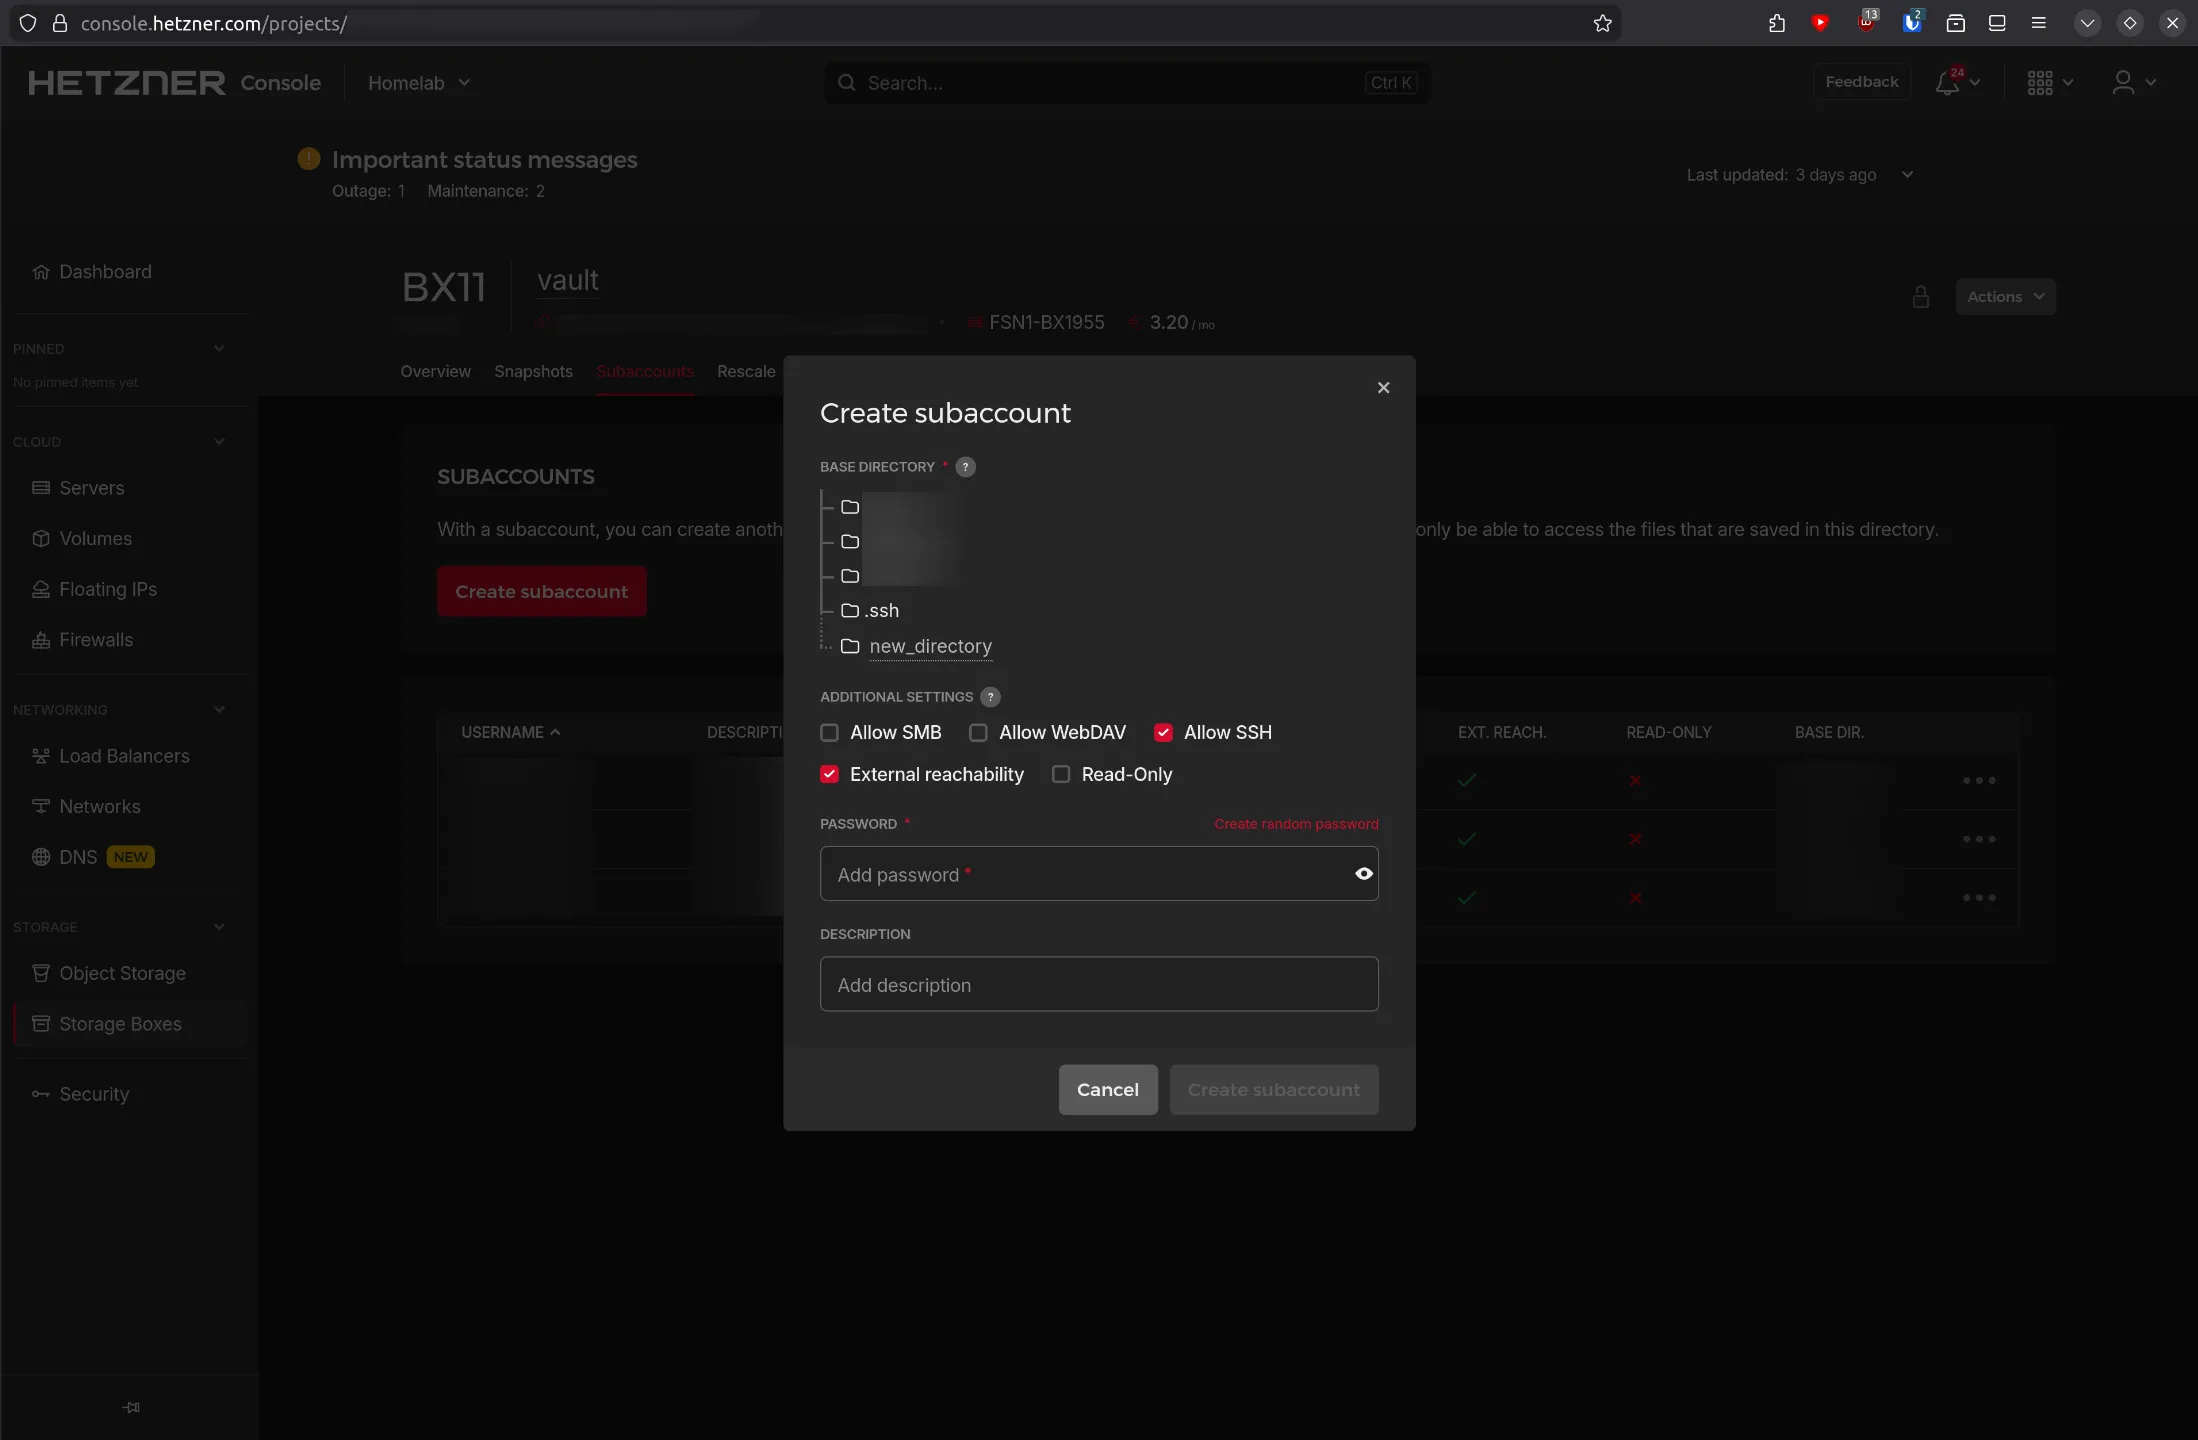
Creating a sub-account
This helps avoid interfering with other backups, like overwriting them by accident… like that would happen (ᵔ.ᵔ) And it’s good practice to follow the separation of privileges principle.
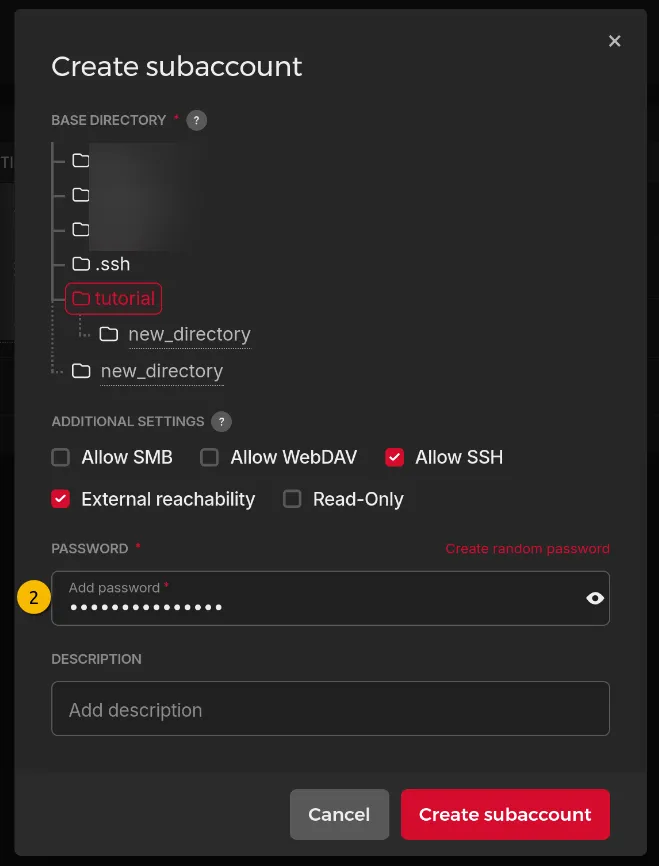
We make the sub-account accessible from outside the Hetzner network (if need be, this can be disabled when backing up through an Hetzner VPS) and we make it accessible via SSH. In my opinion this is both the safest and easiest for a critical task like backups.
I also create a new base folder for each specific subaccount, otherwise the “non-tampering of other repositories” idea is void.
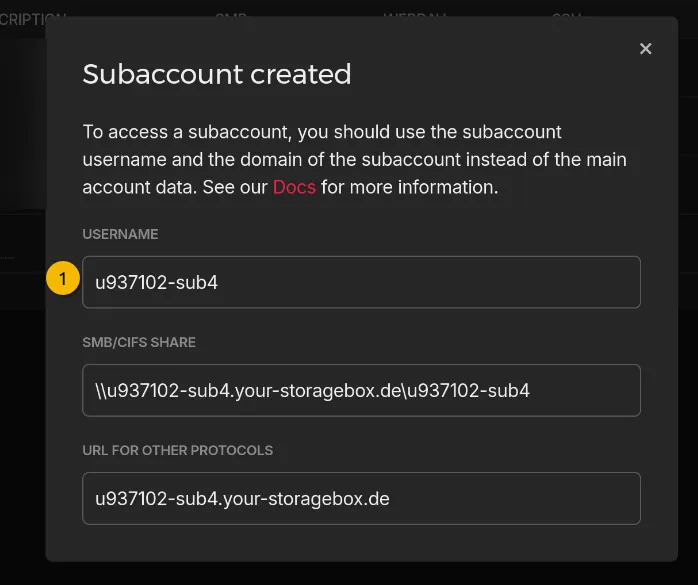
Information to keep :
- + The user of the sub-account
- + The password you put to create the subaccount
Creating the repository folder
Now we need our VPS to be recognized by the Hetzner storage box, for this we follow the official documentation :
ssh-keygen # **No passphrase**, makes the configuration a lot easier
cat ~/.ssh/id_ed25519.pub | ssh -p23 "$SUBACCOUNT_USER@$SUBACCOUNT_USER.your-storagebox.de" install-ssh-key
Hetzner maps the folder we specified in the last figure as /home.
But I always create another folder structure, to keep things tidy (this does not serve any purpose apart from looking nicer)
ssh -p23 "$SUBACCOUNT_USER@$SUBACCOUNT_USER.your-storagebox.de" mkdir -p "/home/$HOSTNAME/backups"Install borgmatic
As with any good tutorial, update your system first :
apt install borgbackupTo install borgmatic, first install Borg, at least version 1.1. Borgmatic does not install Borg automatically so as to avoid conflicts with existing Borg installations.
apt install borgbackupLet’s install borgmatic via the recommended way, using pipx. This will give us the latest version of borgmatic (way easier to follow the documentation) :
apt install pipxThen we can install borgmatic as root :
I know, I know… root service = evil but I consider that we need to make it work first, then rework security into our workflow, so we’ll see about that later in the article.
This will add /root/.local/bin to the PATH in your .bashrc and reload the terminal to accept changes.
pipx ensurepath && source ~/.bashrcNow we can finaly install borgmatic
pipx install borgmaticConfiguring borgmatic
Borgmatic works via a configuration file, we can use this utility to generate a default configuration file that we can start from :
borgmatic config generate # Generating a configuration file at: /etc/borgmatic/config.yamlThis is my “sane default” configuration I put in my /etc/borgmatic/config.yaml :
Replace the following
- <hostname> with hostname of the machine (
echo $HOSTNAME)- <subaccount> with username of new sub-account
source_directories:
    - /home
    - /etc
    - /var/log/
    - /root
repositories:
    - path: ssh://<subaccount>@<subaccount>.your-storagebox.de:23/home/<hostname>/backups
      label: hetzner-storage-box
      encryption: repokey-blake2

encryption_passphrase: "{credential systemd borgmatic.pw}"

compression: zstd,3

keep_daily: 7
keep_weekly: 4
keep_monthly: 6
keep_yearly: 1

verbosity: 0
syslog_verbosity: 1
log_file_verbosity: 2
log_file: /var/log/borgmatic/logfile

progress: true
Create the passphrase secret
You may have noted that in the configuration file we specify the encryption passphrase like so encryption_passphrase: "{credential systemd borgmatic.pw}"
WARNING : This does prevent the passphrase from leaking as it is encrypted, BUT if a hacker compromises the
rootaccount they can already use regular borgmatic commands on the repository, so this does not prevent any foulplay !
systemd-ask-password -n | systemd-creds encrypt - /etc/credstore.encrypted/borgmatic.pwInformation to keep :
- The user of the sub-account
- The password you put for the create subaccount
- + The repository encryption passphrase
Handling logs
If you want no logs (apart from journalctl) you can ignore this part and remove
log_file: /var/log/borgmatic/logfilein the configuration file
To prevent the logs from growing to big we need rotate them, meaning we keep only the recent logs, compress the old ones and remove the very old ones.
Logrotate is pretty much the standard for such a use case :
apt install logrotateBorgmatic does not create folders by default, so we need to do it ourselves. Rur logfile should be be located at /var/log/borgmatic/logfile so we can create the following folders :
mkdir -p /var/log/borgmaticTo configure logrotate and tell him to handle our borgmatic logfile we can add this to /etc/logrotate.d/borgmatic :
/var/log/bormatic/logfile {
	weekly
	rotate 12
  notifempty
	compress
  endscript
}
Creating the repository
With all the work we did, we can finally create the repository :
borgmatic repo-create --encryption repokey-blake2IMPORTANT : Export the repokey with
borgmatic key exportand save it elsewhere than inside the VPS you are backuping
Information to keep :
- The user of the sub-account
- The password you put for the create subaccount
- The repository encryption passphrase
- + The repository decryption key
We can test that our setup works by making our first backup manually :
borgmatic createAutomating the backups
Borgmatic is configured, but not automated yet. Borgmatic can be automatically started via a systemd service.
And they already provide the necessary files to do so, we can download them and put them in /etc/systemd/system so that systemd can find them.
curl https://projects.torsion.org/borgmatic-collective/borgmatic/raw/branch/main/sample/systemd/borgmatic.service | sudo tee /etc/systemd/system/borgmatic.service
curl https://projects.torsion.org/borgmatic-collective/borgmatic/raw/branch/main/sample/systemd/borgmatic.timer | sudo tee /etc/systemd/system/borgmatic.timer
We just need to enable the timer :
sudo systemctl daemon-reload
sudo systemctl enable --now borgmatic.timer
By default a backup will be made every day at midnight, with a random delay up to 10 minutes added on top
And if the system was off at the scheduled time, it runs immediately on the next boot
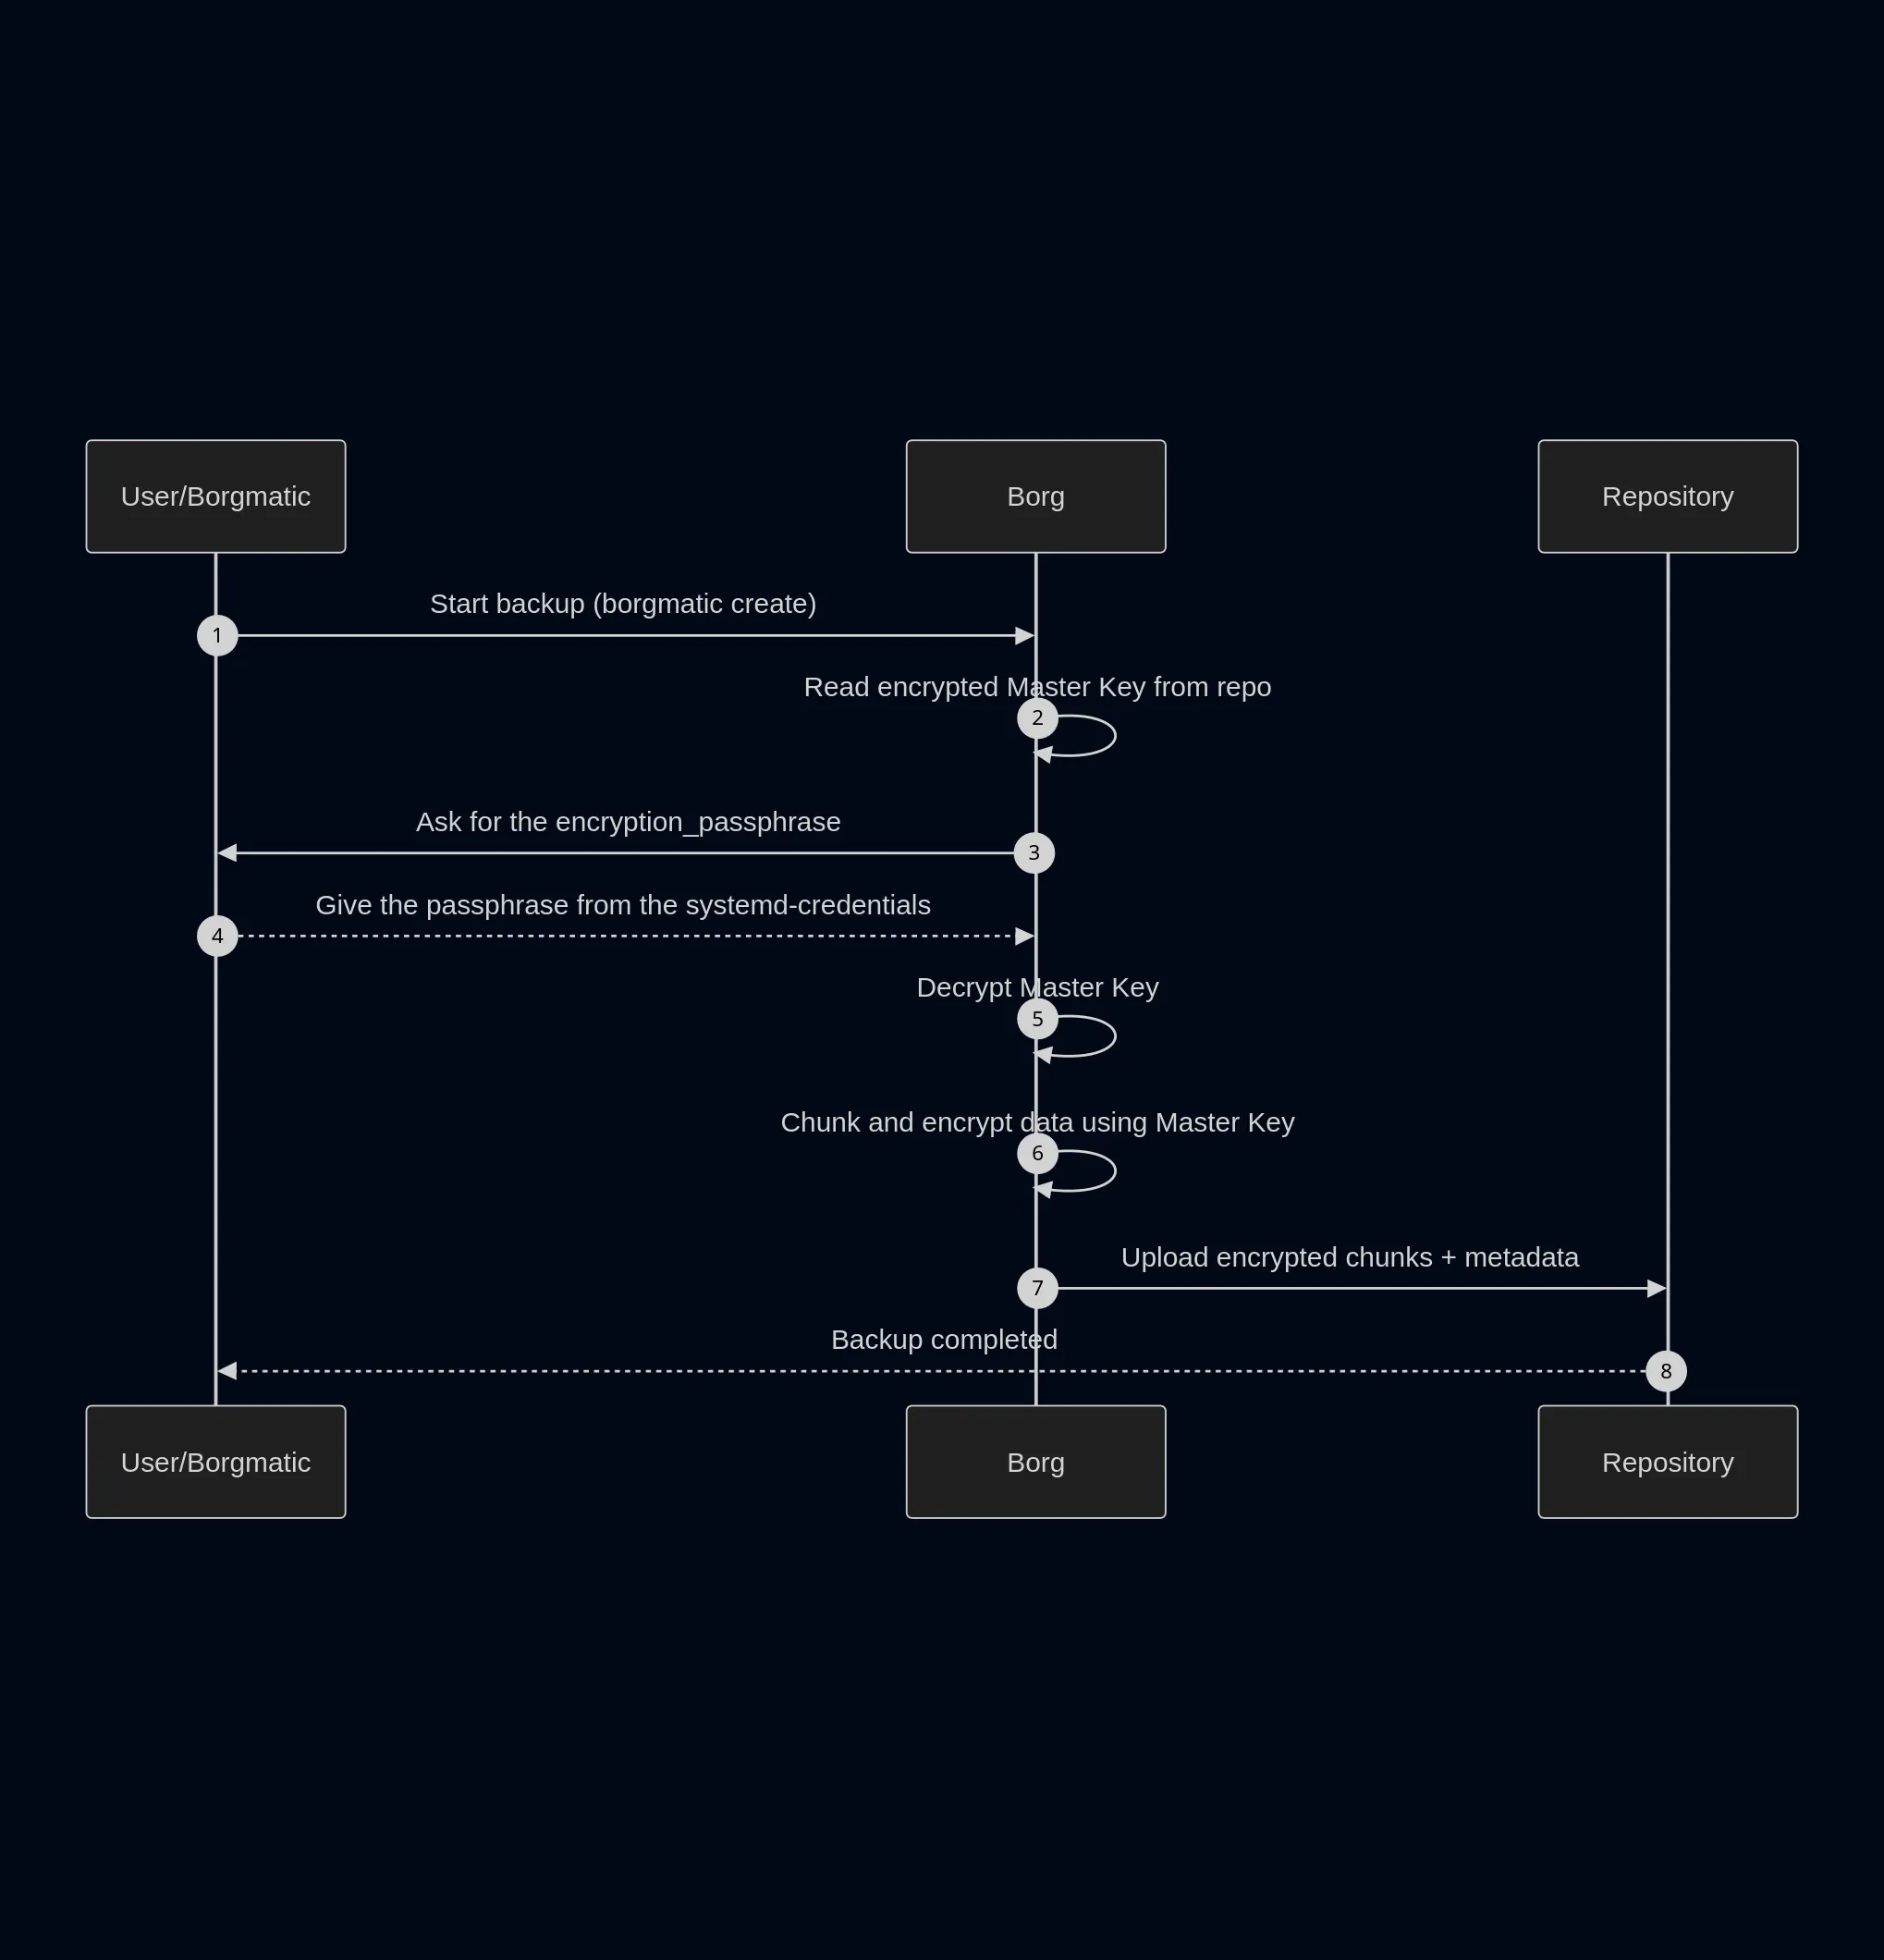
How does the repository work
When the repository is created (borgmatic repo-create --encryption repokey-blake2) an decryption key is created, let’s call it “Master Key”.
This Master Key is then encrypted with our encryption_passphrase, so that if anyone has access to our repository, they won’t be able to decrypt the actual content.
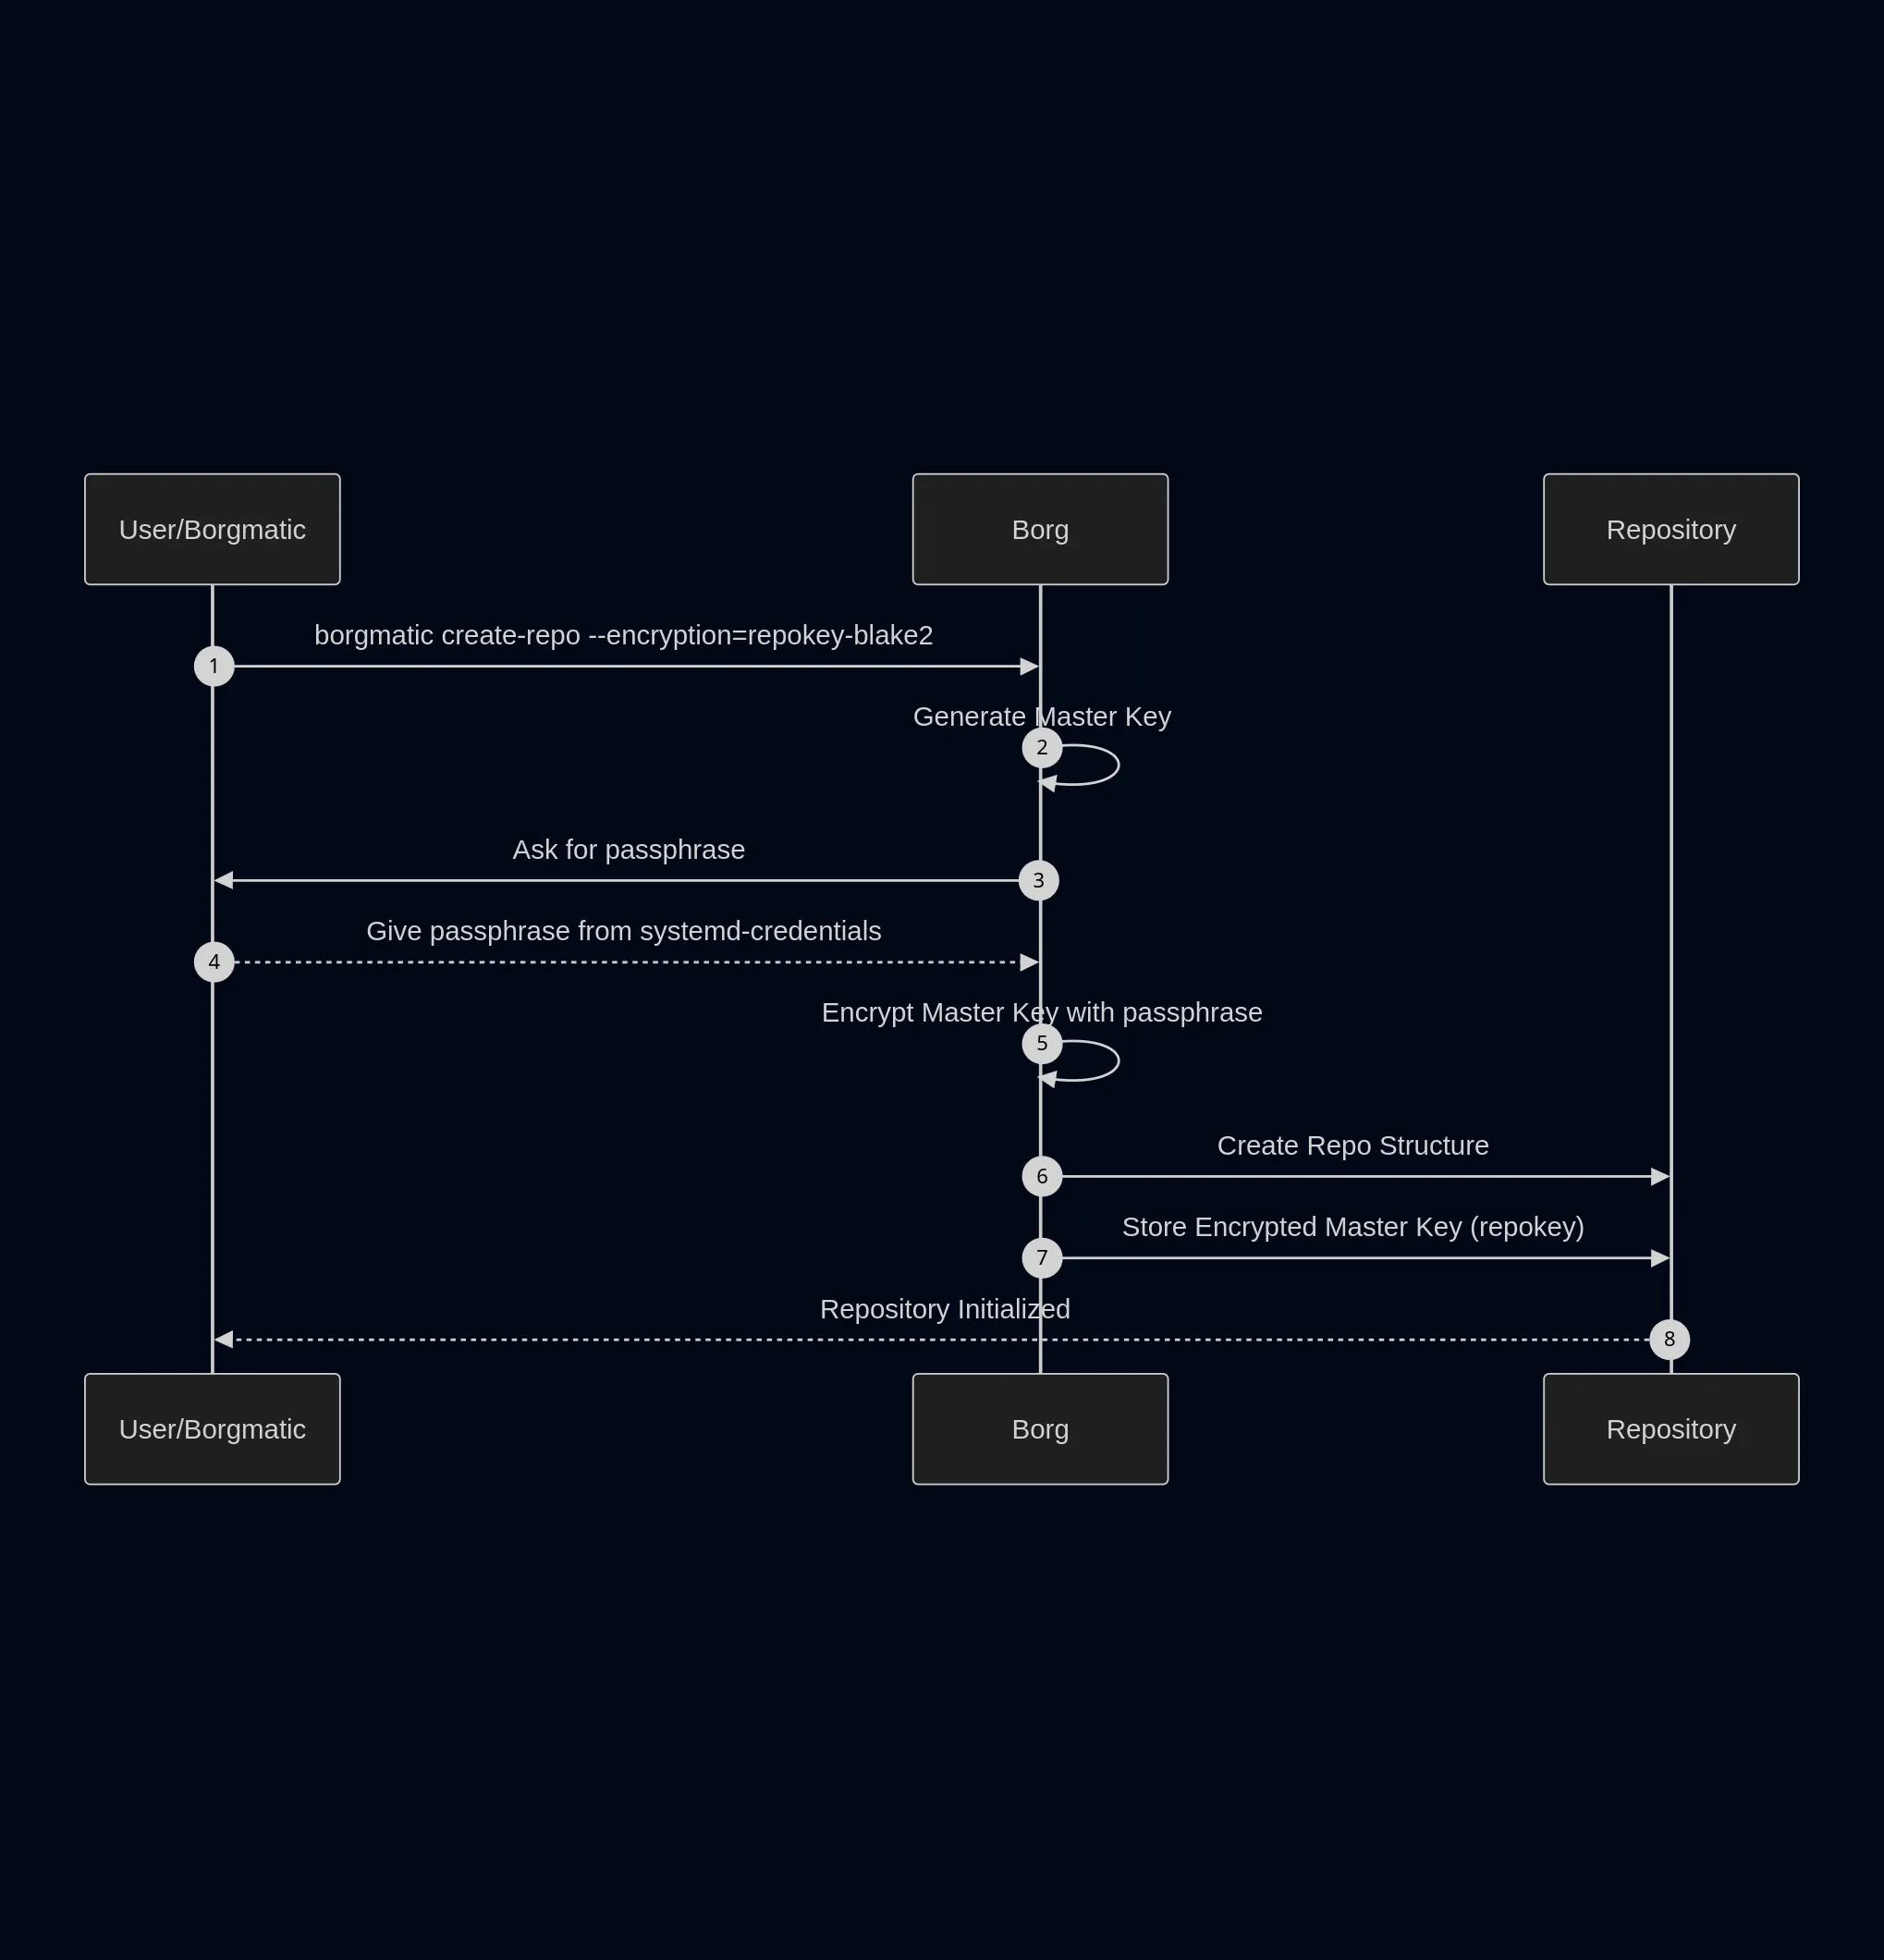
So, on each backup we make the process is as follows :
Final words
As with any article of mine if you see any errors or simply want to talk you are welcome to contact me at at defaultmodel[а𝗍]pm[ԁо𝗍]me
Annex
Diagrams source code :
sequenceDiagram
    autonumber

    participant U as User/Borgmatic
    participant B as Borg
    participant R as Repository

    U->>B: borgmatic create-repo --encryption=repokey-blake2
    B->>B: Generate Master Key
    B->>U: Ask for passphrase
    U-->>B: Give passphrase from systemd-credentials
    B->>B: Encrypt Master Key with passphrase
    B->>R: Create Repo Structure
    B->>R: Store Encrypted Master Key (repokey)
    R-->>U: Repository Initialized
sequenceDiagram
autonumber
participant U as User/Borgmatic
participant B as Borg
participant R as Repository
U->>B: Start backup (borgmatic create)
B->>B: Read encrypted Master Key from repo
B->>U: Ask for the encryption_passphrase
U-->>B: Give the passphrase from the systemd-credentials
B->>B: Decrypt Master Key
B->>B: Chunk and encrypt data using Master Key
B->>R: Upload encrypted chunks + metadata
R-->>U: Backup completed